Showing posts with label Site Map. Show all posts

Friday, 26 September 2014

Remove Write Protection from Pen drive/Memory Card

How to Remove Write Protection from Pen drive/Memory Card: In our daily life, we migrate GB’s of data from one memory storage to another. Everyone uses pen drive (USB) and memory card to transfer data from one computer to another. From the last decade, the use of pen drives (USB) has increased on a large scale. Since it is easy to carry and quite affordable, therefore, people prefer to use them. But many a times, people complain about Write Protection error in their USB or memory card. Whenever they try to copy something in their Pen drive, a pop up error called “The disk is write-protected” appears on your screen as shown in the below image.
How to Remove Write Protection from Pen drive/Memory Card
_The disk is write protected error_
If you are getting the same error on your USB pen drive or memory card, then do not need to worry. I’m gonna share some tricks to fix this Write Protection error. But at first, let us go to the core and try to understand the base of the error.

Reasons for USB Write Protection error:

The quite possible reasons for the write protection error in your USB/memory card is as below:
  • Usually, manufacturers protect the USB from being edited. So, it gets limited to read only purposes.
  • Many a times, PC users enable write protection in their pen drive in order to prevent malware and virus attack.
  • Memory cards have a small button in it which allows it for the read only purpose. Thus, always make sure to check the button before using it.

How to remove Write Protection from Pen drive or Memory Card?

I Process – Perform Low-level Formatting:

  • The default formatting method cannot solve this issue. You need to perform low-level formatting for it. To do it, Download a tool called low level formatting tool from the below link.
  • Now, Perform the formatting procedure in your pen drive or memory card via this tool.
How to Remove Write Protection from Pen drive/Memory Card
_Low Level Formatting_
  • Then, open RUN dialog box by pressing Windows+R keys and type diskmgmt.msc in the box.
diskmgmt.msc
  • A disk management window will appear on your screen. You could see your memory card or pen drive along with your partitions in the window. Allocate the space to the drive.
Your pen drive/Memory card is free from Write Protection error.  You can now use it with no limitations.

II Process – Edit Registry Keys:

If the above method does not work in your case then try this process. But before editing registry make sure to backup all registry settings as it may lead to system crash.

Steps to Remove Write Protection Using Registry Editor:

  • At first, open RUN dialogue box by pressing Windows+R keys and type regedit in the box.
diskmgmt.msc
  • Now, you are going to do some tweaking. Search for the following keys from the edit menu:
HKEY_LOCAL_MACHINE\SYSTEM\CurrentControlSet\Control\StorageDevicePolicies
  • Go to Write Protect key in your right hand side as shown in the below image and change the value from 1 to 0.
How to Remove Write Protection from Pen drive/Memory Card
_Registry editor keys_
  • The setting ‘1’ means ON while ‘0’ means OFF.
How to Remove Write Protection from Pen drive/Memory Card
_changing value from 1 to 0_
  • If the following key does not exist in your system then simply download the below batch file and run it. It will add the required keys in your system.
  • Close the regedit Window when the editing is finished. Restart your PC.
  • You are done. You might see your pen drive or memory card is free from Write Protection error now.

III Process – For Transcend Memory card and pen drive only.

This solution only works for Transcend memory card and pen drive only. A tool called Online Recovery Tool helps you to remove Write protection error from Transcend memory card or Pen drive.

Steps to Remove Write Protection from Transcend Memory card and Pen drive:

  • At first, download Online Recovery Tool from the below link and run Jetflash Online Recovery Tool in your PC.
  • Now, plugin your write protected Transcend memory card/pen drive in your PC.
  • Choose any one of the the following options :- “Repair and erase data” or “Repair and keep existing data”.
Jet Flash Online Recovery Tool
_Jet Flash Online Recovery Tool_

  • Wait till the process is completed. A confirmation message ‘Format Complete’ will appear on your screen.
  • Disconnect your memory card/pen drive and replug it.
  • That’s it. You are done now. Your Transcend memory card/ pen drive is free from write protected error.

Motorola Moto G common problems and fixes

Motorola Moto G common problems and fixes: Moto G is one of the best medium range phone available in market. With latest operating system and good processor one can do multiple tasks easily. But no phone is perfect and same is with Motorola Moto G. Users are facing many problems in Moto G and in this post I am going to fix some of the most common problems faced by you.
Motorola Moto G common problems and fixes

Some of the Motorola problems that we are going to fix here are:

  • Motorola Moto G connection losing problem after the update to 4.4.2
  • Motorola Moto G Wi Fi problems
  • Motorola Moto G poor sound problems
  • LED light not working
  • Battery drain very quickly in Motorola Moto G

I hope these 5 problems will cover up all your questions regarding Motorola G.

Problem – Motorola Moto G connection losing problem.
Many users have complained that they are getting defective pieces of Motorola Moto G. Connection losing is very common in Motorola Moto G. Phone is available for android 4.4.2 version when one get the new set. Once updated it is causing too much connection lost problem. Many are experiencing problem like connection lost to calls or internet and even losing connection with SIM card. So below you can read the solution on how you can fix Motorola Moto G connection dropping problem.
Fix Motorola Moto G connection dropping problem.
As this is very common problem among Moto G users, Motorola service centers will try to sort out this as quickly as possible. From your side you can turn off your device then turn it on. This technique is effective on temporary basis. But I strongly suggest that if your are facing connection losing problem in you Motorola Moto G take your phone to the service centre.
Problem: Motorola Moto G connection Wi Fi dropping problem.
This is very common problem not only in Moto G but also in many other devices. When one tries to connect their smart phone to different router they could no connect it easily. Others complain that their Moto G couldn’t’ find the Wi Fi network even they are closer to router. Wi Fi dropping in middle of the task is also very common. So read the solution below that will help you to fix Motorola Moto G connection dropping problem when connected to Wi Fi.
Solution: Moto G couldn’t find Wi Fi network or Wi Fi network dropping.
Problem connecting with Wi Fi can be resolved by
Settings >> Wi Fi >> advanced and make Wi Fi turn on during sleep.
If this doesn’t work you can try:
Settings >> Wi Fi >> keep pressing your router option. Select forget network. This will disconnect router connection from Moto G. Again connect it to your router and fill all the details.                                                                                                                                                              I hope these methods will help you to troubleshoot the Wi Fi connection and dropping problems in your Moto G.
Motorola Moto G common problems and fixes
Problem: Motorola Moto G battery drain problem.
2070mah batteries for 4.5 inch display a decent option. But many of the Moto G users have complained that battery drain is common problem in their sets. This problem becomes more excessive when they connect their device to Wi Fi router.
So read the solution below that will help you to fix your Motorola Moto G battery drain problem.
Solution: To reduce the fast battery drain problem in your Motorola Moto G:
Turn off unnecessary apps running in your device. You can also use clean master etc to kill those apps. Battery doctor is also an amazing app that will help you to increase your battery life up to 50%.
If you facing excess of battery drain when Moto G is connected to Wi Fi you can fix problem by.
Settings >> Wi Fi >> advanced. In advanced set scanning always to off.
I hope these methods will help you to save battery life of your Motorola Moto G.
Motorola Moto G poor sound quality
Motorola Moto G is a premium device with many features. So users are expecting good quality audio. But when users are listening music or other audio they are experiencing poor audio quality. Below are some possible solutions that can help you to improve your device sound quality.
Fix Motorola Moto G poor noise quality
Settings >> sound >> audio effect, here you can select audio settings as per your comfort. Also you can set the equalizer settings separately for wired stereo and speaker.
These settings will definitely help you to improve Moto G’s low noise quality.
Motorola Moto G common problems and fixesProblemMotorola Moto G LED light was not working properly
Notification light is very important feature in smart phones. Many Moto G users have complained that notification light is not functioning properly. Whenever there is email, miss call, text or any other message LED doesn’t blink.
Well Motorola have noticed this problem in their devices and they have given a solution to it.
Solution to fix Motorola Moto G LED light not blinking:
Use LED notification widget given by Motorola to make the led light work perfectly. Just have the LED widget in your home screen and activate the led light. This will make LED light to work normally.

This method will surely help you to fix LED light issues of Motorola Moto G.

Xiaomi Mi 3 common problems and fixes

Xiaomi Mi 3 common problems and fixes: recently Xiaomi launched its Mi3 model. As we know it was a great hit in Indian market as well in other countries. With amazing hardware configuration and sleek body design it’s a good choice for gadgets lovers. But no device is perfect and so is with Xiaomi Mi3 smart phone. Users are facing many problems in Xiamo Mi3 like heating issues, apps compatibility issues etc. So in this post I will give you fixes of common problems for Xiaomi Mi 3 users.

Here are some problems of Xiaomi Mi3 we are going to discuss in this post:

  • Xiaomi Mi3 overheating problem
  • Xiaomi Mi3 whatsapp sync problem
  • Touch screen not working in Mi3
  • Xiaomi Mi3 battery drain very fast
  • Phone restart automatically
These are top 5 problems faced by Xiaomi users. So here we are to give you the solution.
Xiaomi Mi3 common problems with fixes

Xiaomi Mi3 common problems and their fixes:

Problem: Xiaomi Mi3 overheating issues

If your Xiaomi Mi3 gets heated too much then do not worry. Overheating of devices with good processors is very common problem nowadays. I hope solution given will help you out.

Solution: Xiaomi Mi3 produce too much heat.

Continuous running of all the cores can over heat your device. Main cause of this too much browsing and high-end gaming. To fix overheating problem you can turn on battery saving mode in Xiaomi Mi3.
Menu >> settings >> advanced options >> battery >> battery mode >> turn on battery saver mode.
Also you can stop or kill unwanted applications running in your device. For this you can use apps like clean master etc. Stop using live wallpapers and turn off mobile data when not in use.
I hope these methods will help you.

Problem: touch screen not working or responding very slow

Many users have complained that in middle of any task Xiaomi Mi3 touch screen stop responding or show lags. If you are facing the same problem read the solution

Solution : Xiaomi Mi3 touch screen responding very slow.

To fix this problem you are advised to restart your phone. Else lock and unlock your Xiaomi Mi3, this will help you.
If you are getting this problem too many times then you are advised to take your phone to service centre for repairing.

Problem: Xiaomi Mi3 battery drain very fast.

If your Xiaomi Mi3 is giving you poor battery back up then there are various factors are responsible for it.  Unnecessary apps running in device, GPS and wi-fi are on.

Solution: increase poor battery life of Xiaomi Mi3.

To improve battery draining problem in your Xiaomi Mi3 turn of unnecessary apps running, turn of your wi-fi and GPS. Also you can install many apps like battery doctor etc. to improve battery life of Xiaomi Mi3.
Xiaomi Mi3 common problems with fixes

Problem: xiaomi mi3 restart automatically.

If your phone turn off and turn on automatically it could be due to battery issues, buggy or faulty application installed in your device.

Solution:

Phone restart automatically can be fixed by again charging your phone. Also to remove any faulty app from your Xiaomi Mi3 you should factory reset your phone.
Note: before resetting your device please make backup of all your data.

Problem: Xiaomi Mi3 sync issues with whatsapp.

Solution: to fix sync issues:

You should provide whatsapp access to your contact list. You can do so by
Setting >> apps >> whatsapp >> manage permission >> access to contact list. This will help you to fix sync issues with whatsapp.

I hope this post will cover most of your xiaomi mi3 common problems. If you still fell any trouble feel free to ask in the comment box below.

Windows 7 Not Genuine error Solution

if you are using an unregistered version of Windows 7 then you must be getting an error “This copy of Windows in not genuine”. This error becomes annoying when it changes your colorful desktop background into a black screen. It does not matter how many times you change your wallpaper, it automatically changes your desktop background and flashes this error message “This copy of Windows in not genuine”. In spite of that, Windows 7 Not Genuine error also spoils the performance of your PC. So, at the end, you have to either buy the genuine version of windows 7 or live with this annoying error. But if I say that you can fix windows 7 not Genuine error for free. Yes, you heard it right!! You can fix this error “This copy of windows is not Genuine” in your windows 7 PC without burning a hole in your pocket. I’m gonna teach you How to fix Windows 7 Not Genuine Error- “This Copy Of Windows is not Genuine” without using any crack, activator or software. Just follow some simple steps and you can escape this annoying Windows 7 not Genuine error.

Windows 7 Not Genuine error

Demerits Of Windows 7 Not Genuine Error- “This Copy Of Windows is not Genuine”:

Windows 7 not genuine error causes serious problems in your PC. Some of them are listed below:
  1. It changes your colorful wallpaper to a black screen and flashes an annoying message “This copy of windows is not Genuine”.
  2. It affects the performance of you PC and slows it down.
  3. It creates instability in your system causing error in some of the programs.
  4. If you are using a laptop then it can even affect its battery life.
So, it is always better to fix Windows 7 Not Genuine Error- “This Copy Of Windows is not Genuine” as soon as it is possible.

Solution to Fix Windows 7 Not Genuine error – Easy methods:

You can easily fix Windows 7 not Genuine Error- “This Copy Of Windows is not Genuine” by two methods. I’m gonna explain you both methods but prefer to use the first method. If the first method does not help then opt for the second method. So, here are the methods to fix Windows 7 not Genuine Not Genuine Error.
NOTE: Before opting for these methods, make sure you have administrator privileges of your system. Or else, these methods won’t work.

- Method 1: Using Command Prompt

  • Press “Windows” button in your keyboard and type cmd.
  • Right click on it and select “Run as Administrator”.
  • A message would prompt on your screen asking you for permission to initialize the program. Click on”Yes”.
  • Now, Windows Command Prompt box would open on your screen.
  • Now, type the command “SLMGR – REARM” (without quotes) as shown in below image and press Enter.
NOTE: Type it as it is. It is case sensitive. Or else, it won’t work.
Fix Windows 7 Not Genuine Error
_Command Prompt_
  • Wait for a while. You will get a confirmation message “Command completed successfully”.
Fix Windows 7 not Genuine error This Copy Of Windows is not Genuine
_Command Completed Successfully_
  • Now, restart you PC so that the changes could take effect.
That’s it. You’re done. You have successfully fixed Windows 7 Not Genuine Error- “This Copy Of Windows is not Genuine”. Wasn’t that easy. ;)

- Method 2: Tweaking with Windows Update Option

  • Open Control Panel. Go to Windows Update section. To go to Windows Update section, Navigate Control Panel>>System and Security>>Windows Update.
  • Now, click on Installed Updates at the your left bottom.
Control Panel Windows Update Section
_Control Panel Windows Update Section_
  • Then, a list of all your installed updates would appear on your screen.
  • Now, find the update KB971033 and just uninstall it.
Extra Tip: KB971033 is an important Windows update that tells your computer whether your copy of Windows is Genuine or not.
  • Now, restart you PC so that the changes could take effect.

That’s it. You’re done. You have successfully fixed Windows 7 Not Genuine Error- “This Copy Of Windows is not Genuine”.

How To Combine Two Internet Connections


In this Era the internet is fast growing and each and everyone of us depend on the internet but we may get bored with our slow connection or we may have multiple Internet connections like Wi-Fi, Ethernet, 3G/4G cards, tethered smartphones, etc. and we cant combine Two Internet Connections.

How to install Android KitKat 4.4 on your PC using VirtualBox

today we are going to show how to install Android KitKat 4.4 on your PC. To install the latest Android Kitkat on PC.


Thursday, 25 September 2014

How to use WhatsApp on your PC/ laptop without Bluestacks Using Pidgin


Ever wished to use WhatsApp from your computer? That too without using BlueStacks or any other emulators and virtual machines? Here is a quick and easy method that is completely free, reliable and friendly on your computer resources.
Use WhatsApp on PC laptop free
    OR

  1. Run WART and give your phone number with country code.
  1. Example: 61 is the country code for Australia (http://countrycode.org/)
  1. Use WhatsApp on PC laptop free

  1. Leave the password field blank and click on Request Code button.

  1. You will get a SMS/call from WhatsApp shortly with a code.

  1. Type the code in the WART tool and click on Confirm Code button. It will give you a password, copy it to a text file.

  1. Install Pidgin but do not run it. If it launched automatically, use Ctrl + Q to quit it or Buddies -> Quit.

    Use WhatsApp on PC laptop free
  1. Copy the last-whatsapp.dll file into plugins directory within your Pidgin installation (Pidgin Portable/Apps/plugins or C:\Users\\AppData\Roaming\Microsoft\Windows\Pidgin\plugins).
    Use WhatsApp on PC laptop free
  1. Use WhatsApp on PC laptop free

  1. Launch Pidgin.

  1. Click on Add button if Pidgin launches the user account setup wizard automatically. If not, click on Accounts > Manage Accounts > Add.
  1. Use WhatsApp on PC laptop free

  1. In Basic tab, Login Options section, Select WhatsApp as the protocol. Your phone number with country code as user name Give the password you got from WART in step 4.

  1. Click on Add button.

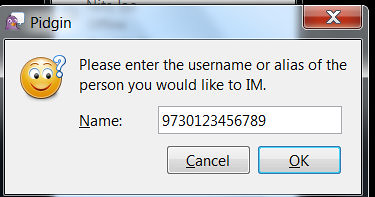
Click on Buddies > New Instant Message > Give your friend's phone number with country code > Click on OK button.
Use WhatsApp on PC laptop free
Click on Buddies > Add Buddy > Give your friend's phone number with country code and provide other details > Click on Add button.
Use WhatsApp on PC laptop free

What you need:

Here is how you can use WhatsApp running on your computer:

To give an instant message:
To add a buddy:

PS: If you are Linux/ Mac user, you can also enjoy WhatsApp. Steps are almost same, just go through the instructions

Note


Whatsapp allows only one client for an account at any instant of time. So if you are using an account on desktop, you will not be able to use that account from Whatsapp on your phone. If you want to use that account from your phone, you will have to re-register from your phone on Whatsapp.

Wednesday, 24 September 2014

Use BlueStacks With Proxy Using Proxy Cap With Video

First Watch The Video , If there is any problem then go with the post thanks...!!


Download and install ProxyCap. Restart your system when the setup program asks you to do so.
If you already have BlueStacks installed, skip to the next step. Otherwise, download the BlueStacks installer, and then run it. After installation completes, the installer will automatically launch BlueStacks. If your access to the internet is through the proxy server only, BlueStacks may stuck with the status "Downloading runtime data" or you may see a black screen. In any case, quit BlueStacks for the time being (right-click on the BlueStacks taskbar icon, and the click Quit).

Configure ProxyCap to work with BlueStacks (Typical Configuration)
We must define 2 separate proxy servers: HTTP and HTTPS. First let's add the HTTP proxy.
Right click on the ProxyCap taskbar icon and choose Configuration.


Click the Proxies category.
Press the New  button on the toolbar.


Select HTTP from the Type drop down list.
Fill in the other settings.
Press the OK button.


Now add the HTTPS proxy. Set the type of the proxy server to HTTPS. The server address and the authorization settings should be the same as for the HTTP proxy.


Now let's create ProxyCap routing rules for BlueStacks. We will add 2 rules: one for the HTTP connections and the other for HTTPS.
Click the Rules category.
Press the New  button on the toolbar.


In the Rule Action section, select the display name of the HTTP proxy server from the drop down list.
In the Program section, click Specify, then click the Browse  button.


Navigate to the BlueStacks program folder. It is located in Program Files on 32-bit Windows or in Program Files (x86) on 64-bit Windows.
Select HD-Network.exe.
Press the Open button.


In the Destination Port Range section, click Specify, then type 80 in the first port field.
In the Rule Name section, enter a display name for the rule.
Press the OK button.


Now add one more "redirect" rule for HD-Network.exe but with the following changes:
1. In place of the HTTP proxy, specify the HTTPS one.
2. In place of the port 80, specify 443.


Click OK to save the configuration.
You are done, run BlueStacks and enjoy!

Configure ProxyCap to work with BlueStacks (Extended Configuration)
The above configuration is sufficient if your system uses a proxy server to connect to the internet. Besides HD-Network.exe, there are 2 other BlueStacks program files (HD-Agent.exe and HD-Frontend.exe) that require an internet access, but, unlike HD-Network.exe, they respect the system proxy settings. So this extra configuration step makes sense only if your system does NOT use a proxy server.
Select the first entry in the rule list.
Press the Properties  button on the toolbar.


Select the Programs tab.


Add HD-Agent.exe and HD-Frontend.exe to the Program list.
Press the OK button.


Repeat the procedure above to add HD-Agent.exe and HD-Frontend.exe to the Program list in the second rule.